How to setup a reverse tunnel with Putty
By Vince
I see a hundred different guides online but none of them really document the easy way to setup a reverse tunnel.
Q: What is a reverse tunnel?
Great question! A reverse tunnel is needed when you are trying to connect to a client computer from an outside connection. A typical scenario is the device you need access to is behind a firewall or proxy. Since you can’t make a direct connection to it (say you want to VNC, RDP, SSH to it, etc), a tunnel is the best way to poke a hole.
I use this putty: https://puttytray.goeswhere.com/
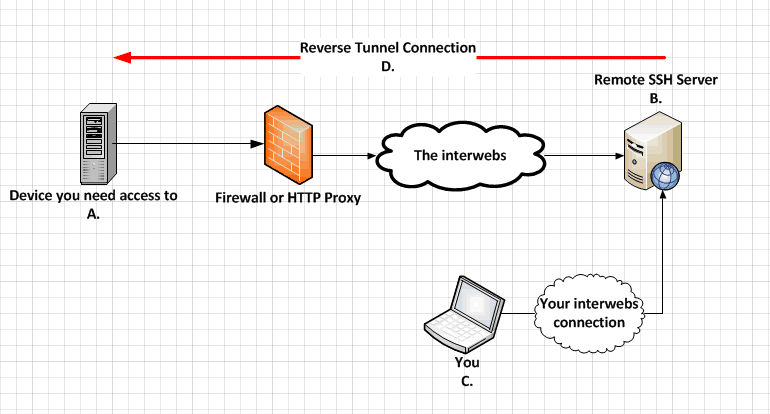
Here is a picture so we can talk to what that means:
 A: The device you are trying to connect to, this is behind some device blocking access like a firewall, proxy, NAT, etc.
B: This is the device that A will tunnel to. Typically this is a linux SSH server on the internet.
C: This is your device, you can be device B if you want, which will skip a step. If your PC is directly accessible by device A (as in your device is is running an SSH server) then you can be the tunnel endpoint. This way you can reverse tunnel directly from B to A. Otherwise there will be two putty SSH connections, A to B, then C to B.
In this example, I will have a VNC Server running on host A that I want to get to with me using host C. It will be listening on TCP port 5900. Here are the steps to set it up:
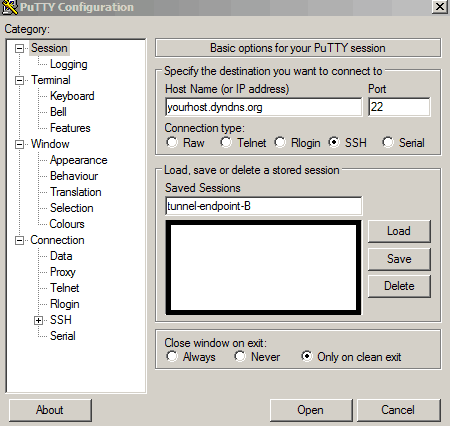
- Setup putty to SSH from host A to host B.

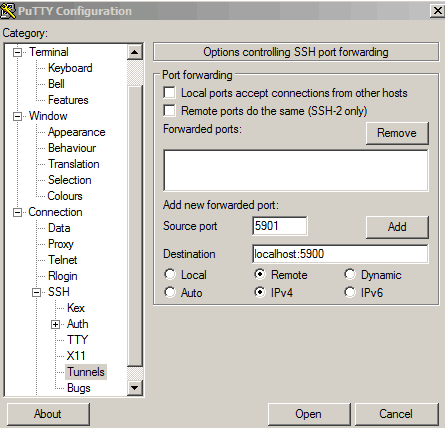
- Click down to the SSH drop down on the left, and go into the tunnel configuration:

The important part in the tunnel configuration is source and destination ports.
Source port: this is the port that is created on host B. This can be ANY port you want. You will use this later down the road so remember it. I like to use different port numbers to keep it clear, but you can use the same port number in this entire example if you so choose.
Destination: this is the port that will be tunneled into on machine A. This is the port your application is running on, so for us its VNC which is port 5900. Localhost is needed so the tunnel with end with machine A.
Remote: this is a remote tunnel which means reverse in our scenario.
Click Add, then click Open.
Your host will now connect, once it does the tunnel to host B is now open. If you want this tunnel to always stay running (assuming your connection doesn’t go down), then enable some keepalives on the connection tab of putty. For “seconds between keepalives” put it to 30, also check the “TCP keepalives” box.
Second tunnel - Host C (your laptop somewhere else).
So we now have the host we need to get to (A) connected to our SSH server (B). Host B is now listening internally on port 5901 for connections to tunnel back to host A port 5900. Note that this port is not open to the internet, its only listening on host B localhost interface. The next step is to create a new tunnel from host C to host B and connecting the two tunnels together.
- On host C, open an ssh session to host B (this should be the same host B you connected to earlier):

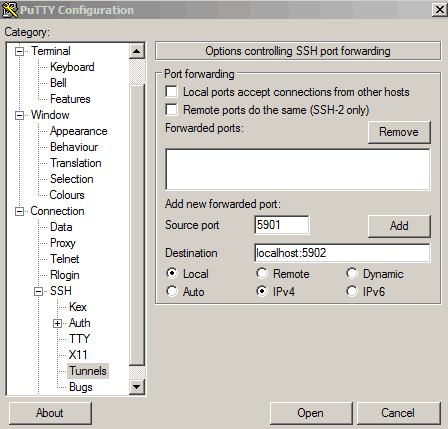
- Click down to the SSH drop down on the left, and go into the tunnel configuration:

Source port: this is the same as the other configuration. This means we are connecting to port 5901 on host B in this example. This will bridge our tunnels together.
Destination: this is the port on our machine C that we will create. Localhost allows us to connect to our host C local port 5902, and this will bridge the connection to host A on port 5900.
Local: this is a local tunnel which means tunnel from our machine to the remote machine in this example.
Click Add, then click Open.
Your host will now connect, once it does the tunnel to host B and thus host A is now open. If you want this tunnel to always stay running (assuming your connection doesn’t go down), then enable some keepalives as we discussed before.
The two tunnels are now open, so the last step is to connect to host A’s server. You do this by opening your VNC viewer and connecting to “localhost:5902”. This will open a connection to host A on port 5900 which the server is listening at, via your host B bridging two tunnels together.